Setup guide
Run Multy R2 on your Cloudflare account
Multy R2 splits the shared UI (this Pages app) from your Worker API (R2 bindings + secrets on your account).
You keep the keys and buckets; the browser only stores endpoint records in localStorage.
How the pieces fit
Client
Cloudflare Pages SPA
Hosted once (this site or your fork). Talks to any Multy-compatible Worker via endpoint URL + API key.
Server
Your Worker
Hono API only. Binds your R2 buckets, checks x-api-key, serves /api/r2 and public /cdn aliases.
Requirements
- • Cloudflare account
- • R2 enabled (free tier is enough to start)
- • Workers enabled (free plan works)
Choose a path
Pick your deployment method — the guide will adapt to show only the steps you need.
1. Create an R2 bucket
- 1
Open R2 in the dashboard
Go to the Cloudflare Dashboard. In the left sidebar open Storage & databases → R2 Object Storage (you can also create D1 from that same menu later).
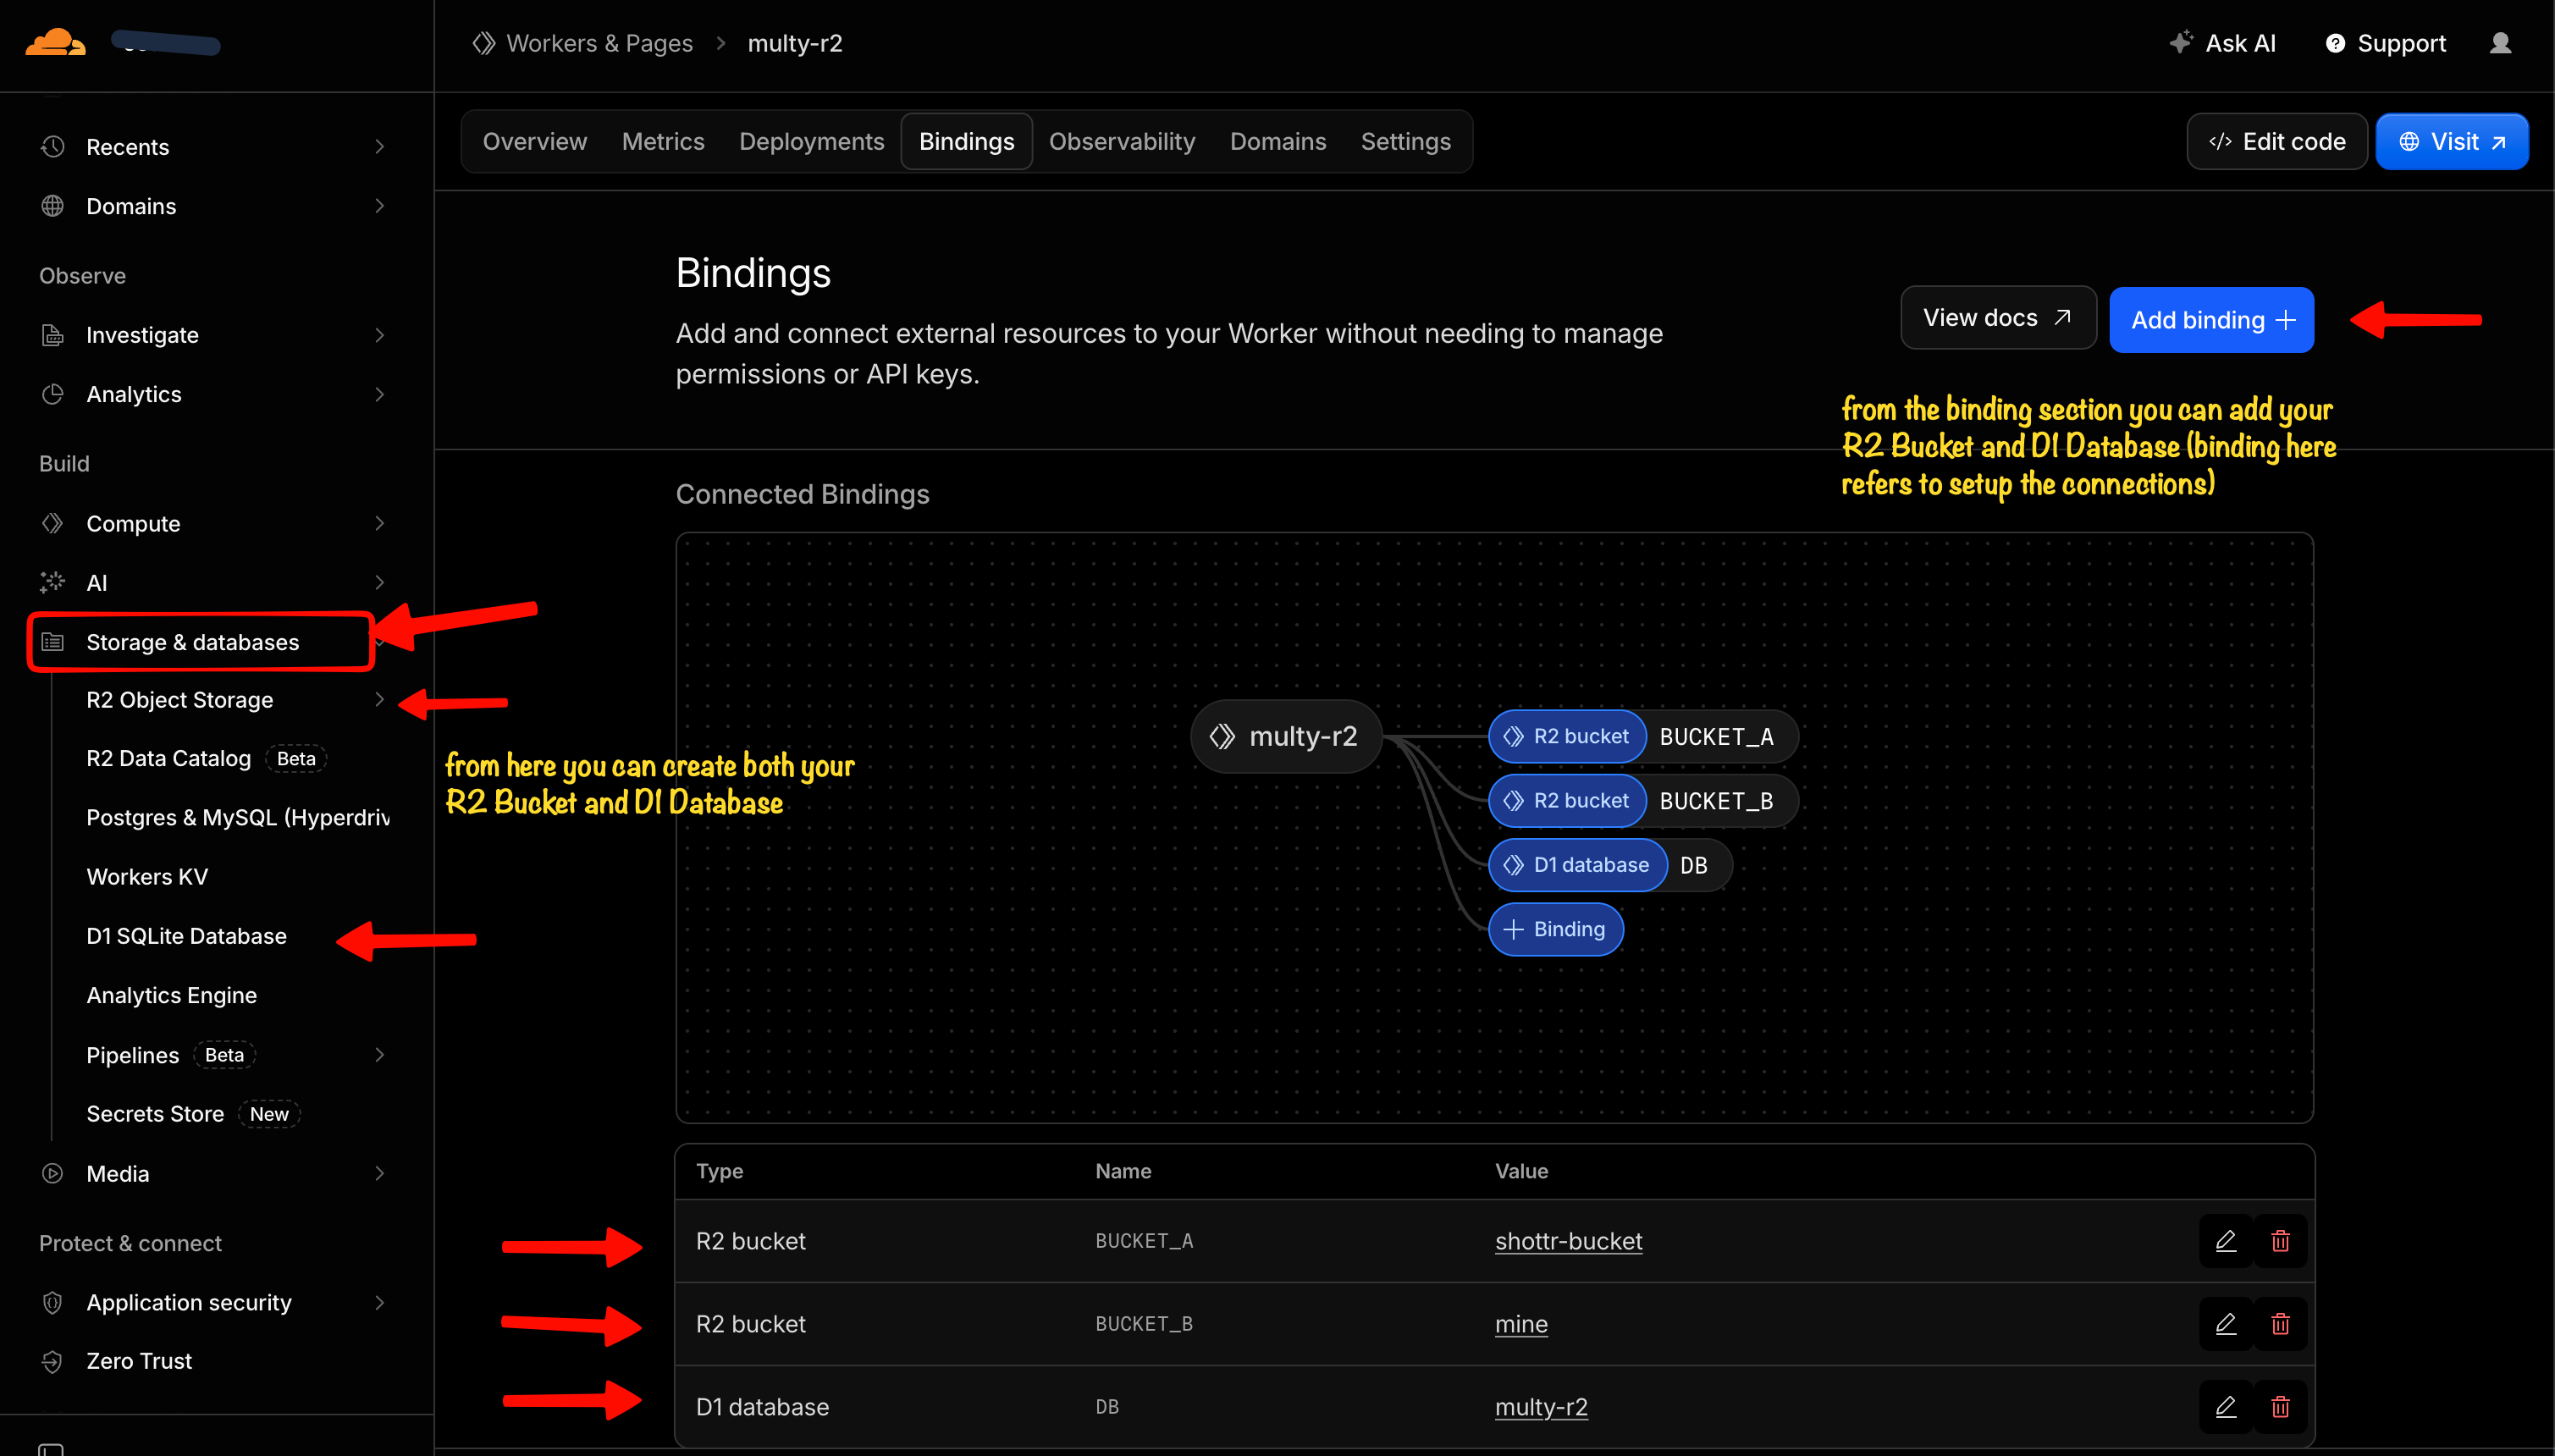
Create R2 buckets (and optional D1) under Storage & databases. Bind them to the Worker in a later step. - 2
Create a bucket
Click Create bucket, pick a name (e.g.
my-assets), create it. Repeat for each bucket you want Multy to manage.
2. Paste Multy's Worker bundle (recommended)
Fastest path for most users — dashboard only, no Node/pnpm required. The paste target is Multy's multi-bucket Worker (same runtime as a CLI deploy). You still must attach bindings and secrets in the dashboard — the JS file alone is not enough.
- 1
Get Multy's Worker bundle
Get the prebuilt multi-bucket Worker from the rolling
workerGitHub Release. Every push tomainrebuilds and updates this asset.Opens the JS inline on GitHub (raw) — select all, copy, paste into the Worker editor.
Raw: https://raw.githubusercontent.com/pantharshit007/multy-r2/release-worker-js/worker.js
Download instead: https://github.com/pantharshit007/multy-r2/releases/download/worker/worker.js
Optional local build:
pnpm build:worker-bundle→dist-worker/index.js. Paste either file into the Worker editor.Local note:
pnpm gen:bindingsbakes friendly bucket labels from yourwrangler.jsoncinto the bundle. Runtime still resolves whatever R2 bindings you attach; only the display names in multi-bucket mode may show Multy's (or your local) bucket names. - 2
Create a Worker (Hello World stub)
Left sidebar: Compute → Workers & Pages → Create.
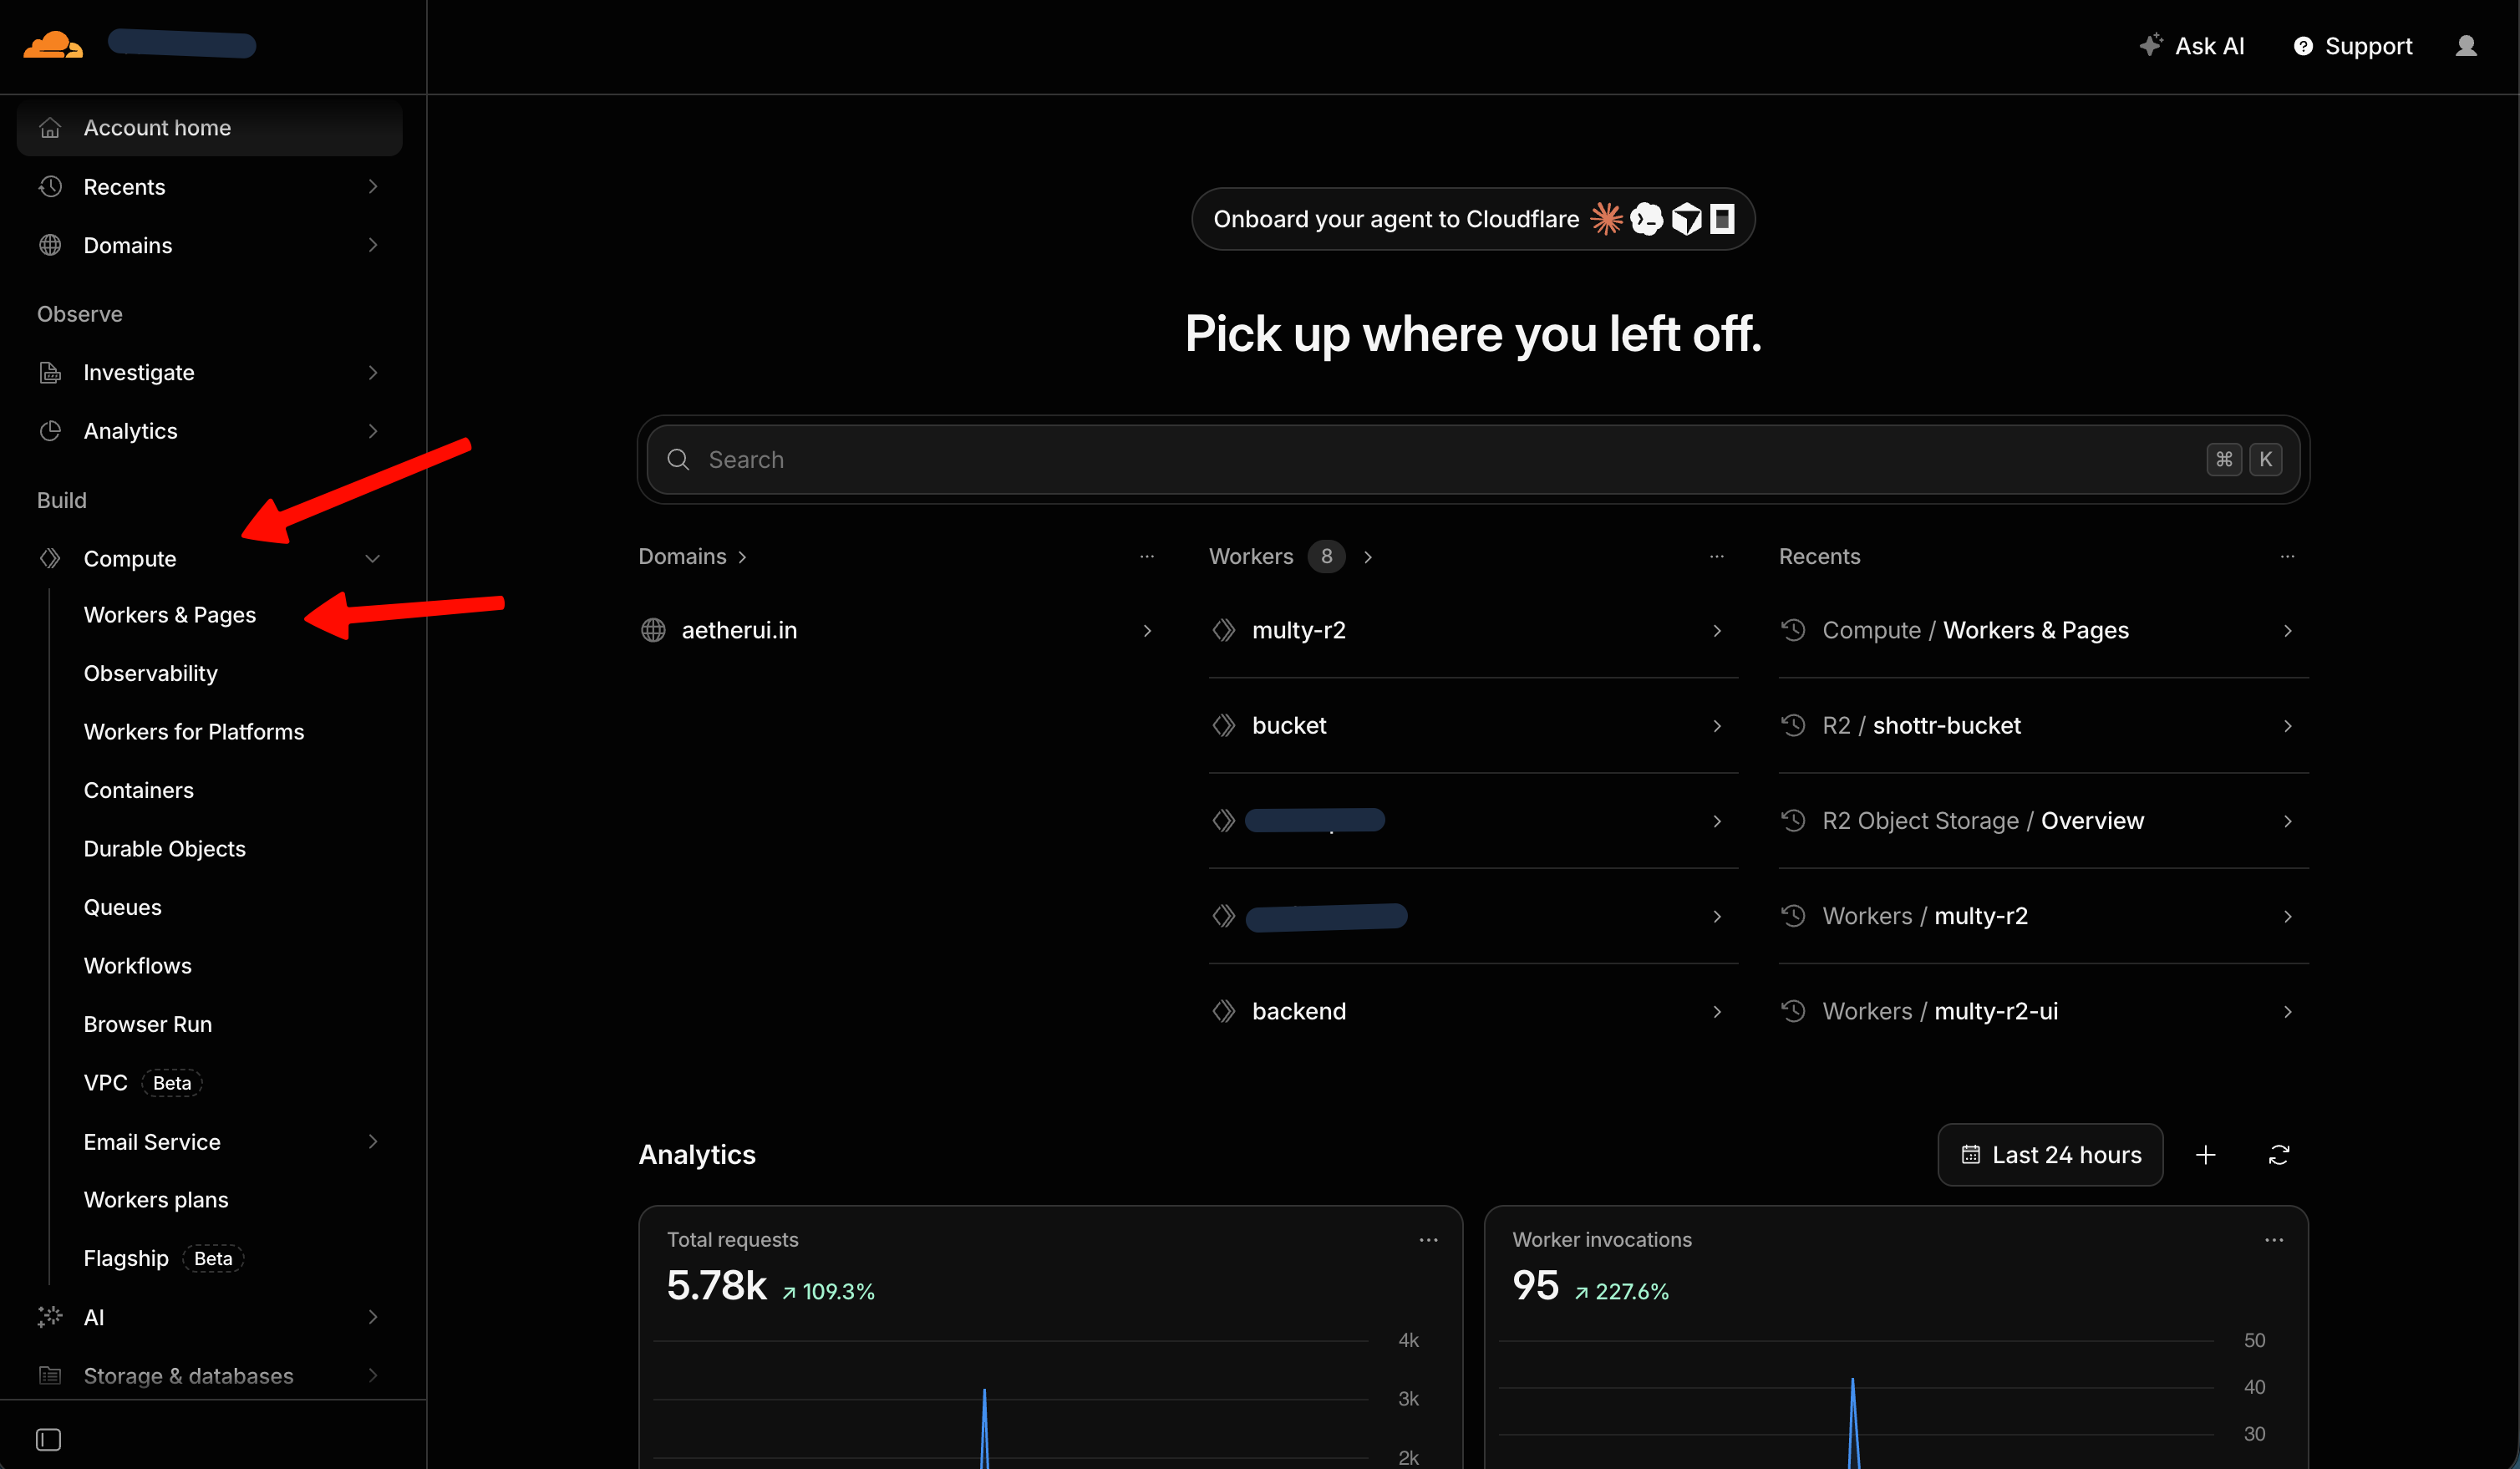
Open Compute → Workers & Pages. Start with Hello World! — you will replace this stub with Multy's bundle next.
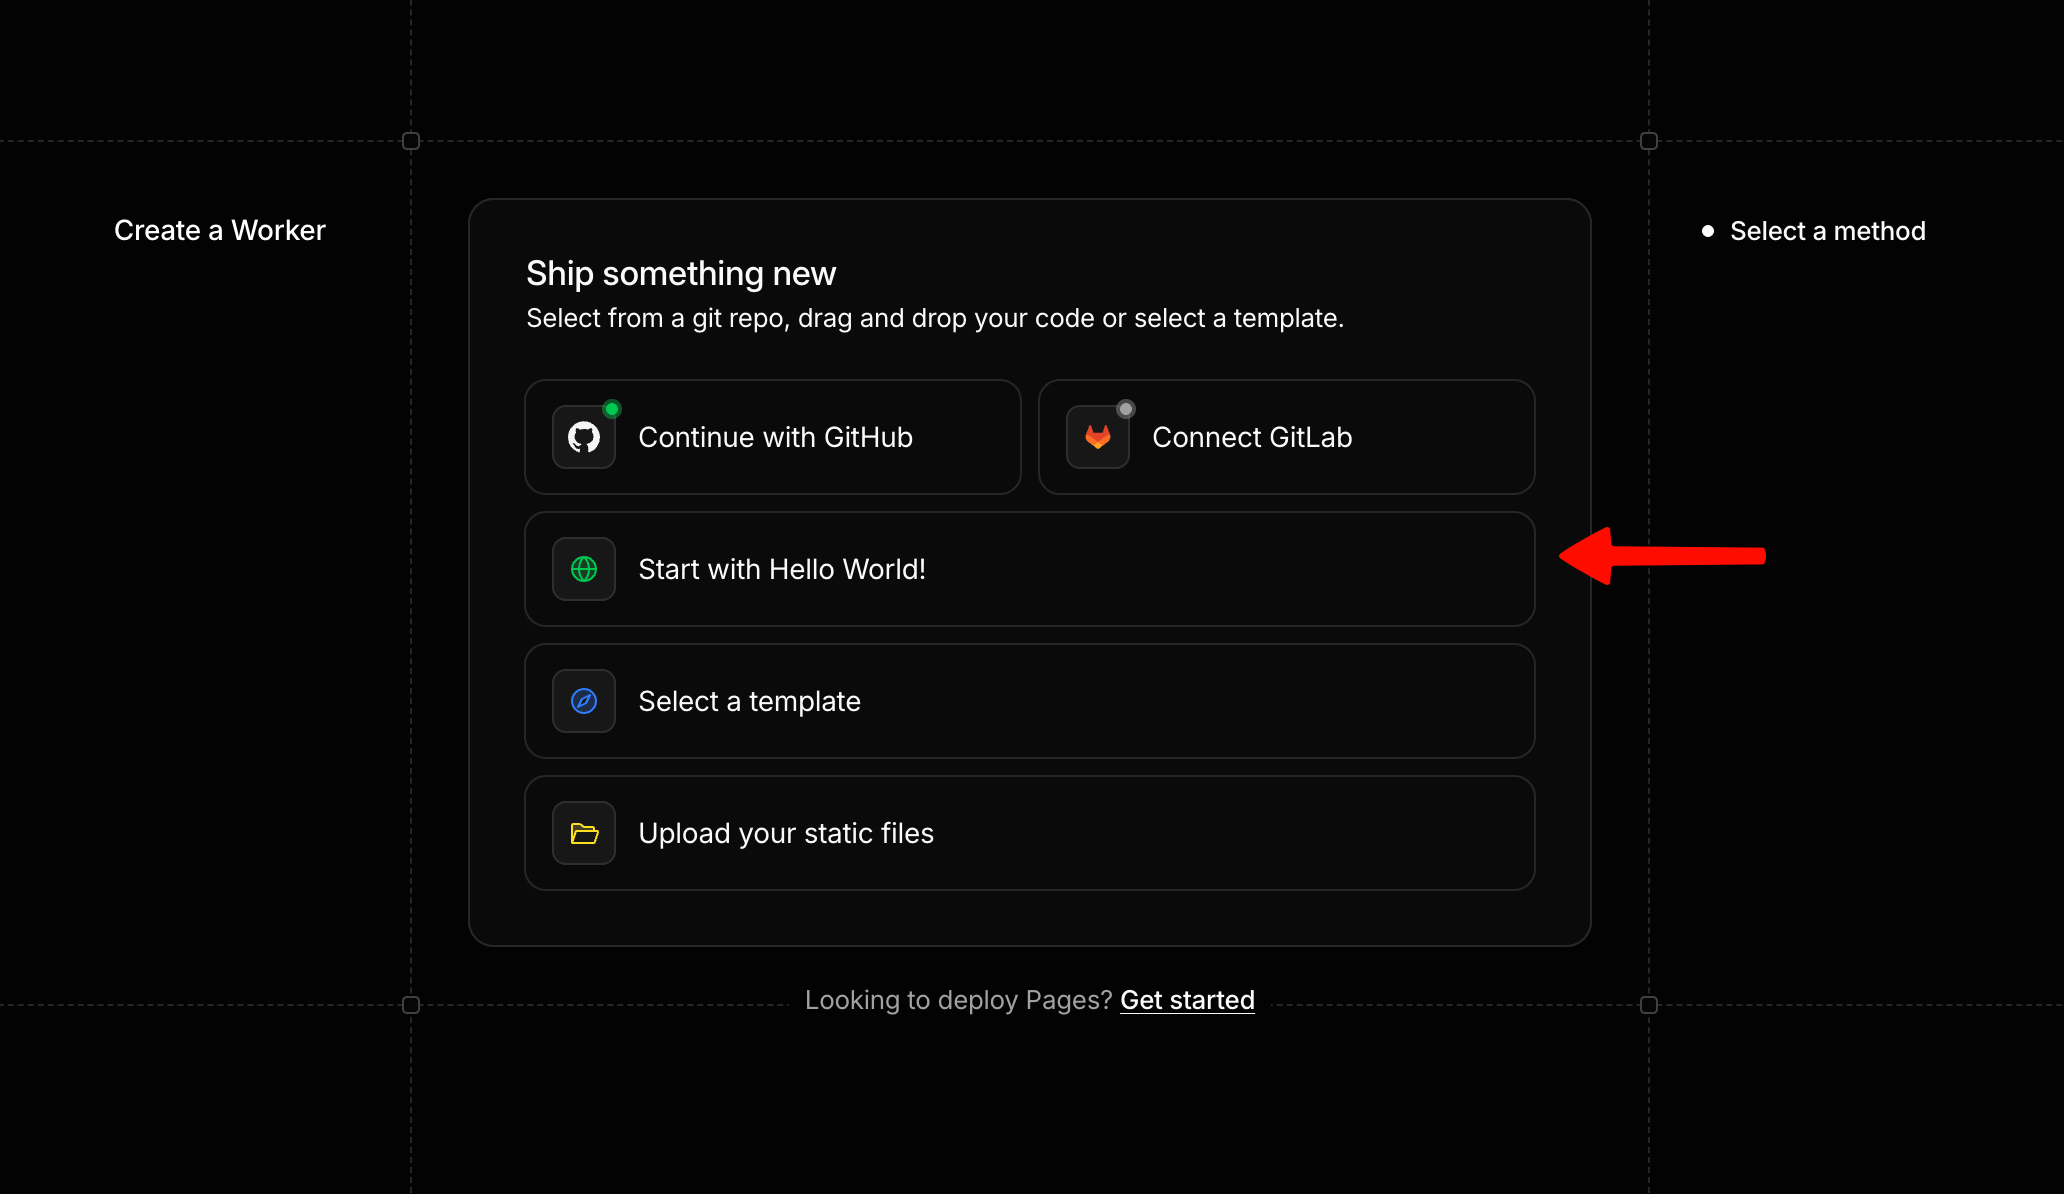
Select Start with Hello World! — you will replace this stub with Multy's bundle next. Name the Worker (Cloudflare suggests a URL; you can edit it), then click Deploy.
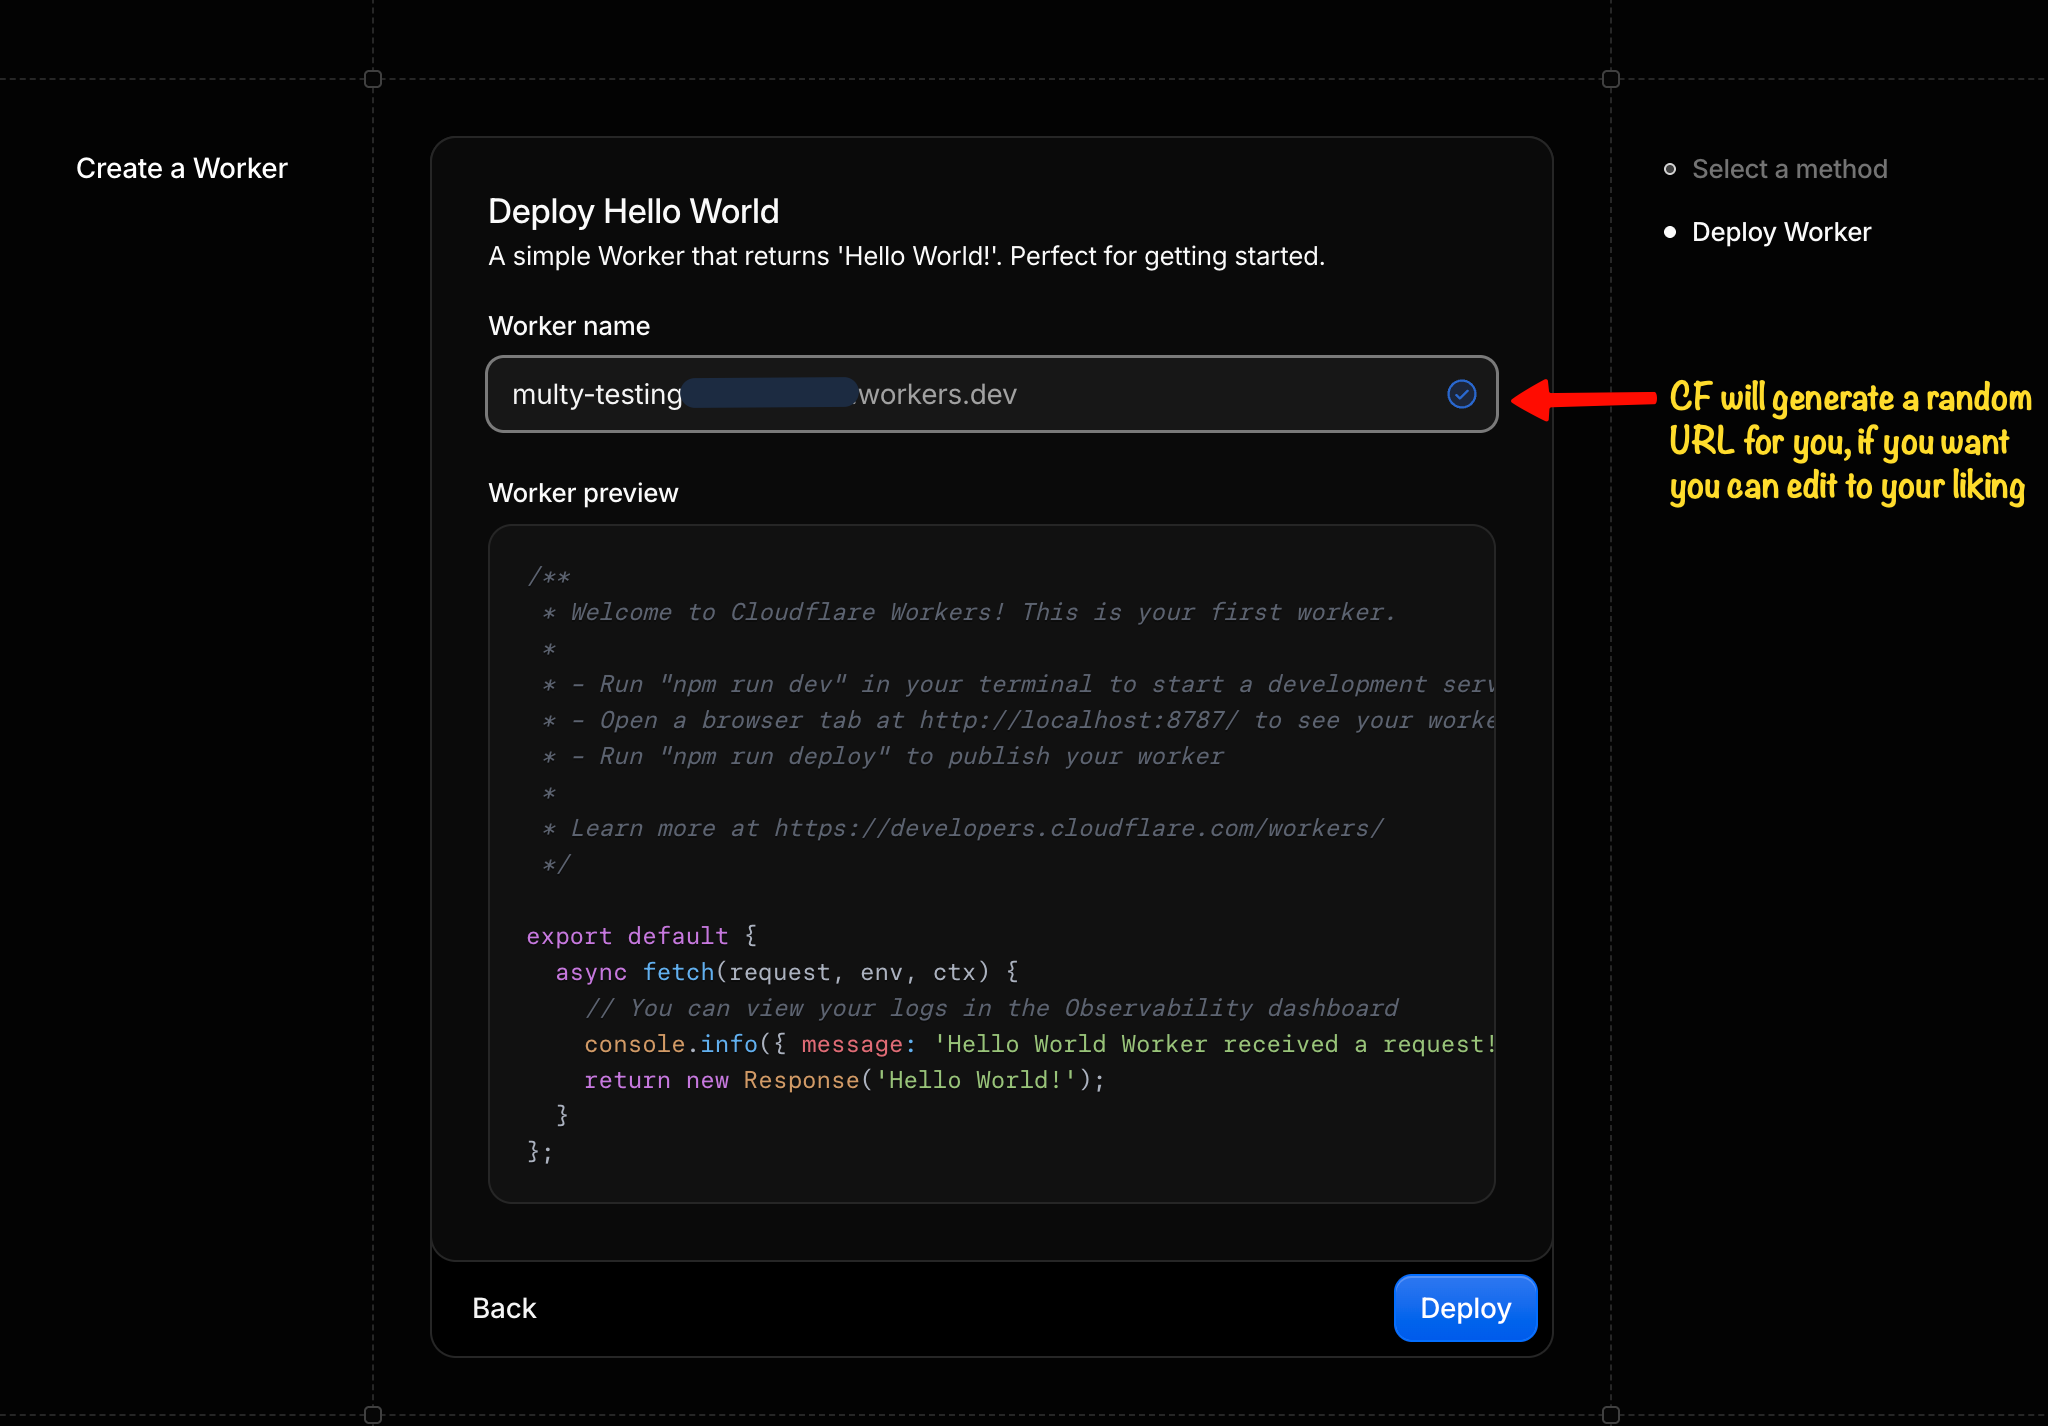
Optional: edit the workers.dev name, then Deploy. - 3
Paste Multy's bundle in the editor
Open the Worker (under Workers & Pages) → Edit code.
Select all of the content, replace it with copied code fromworker.js, then click Deploy (top right).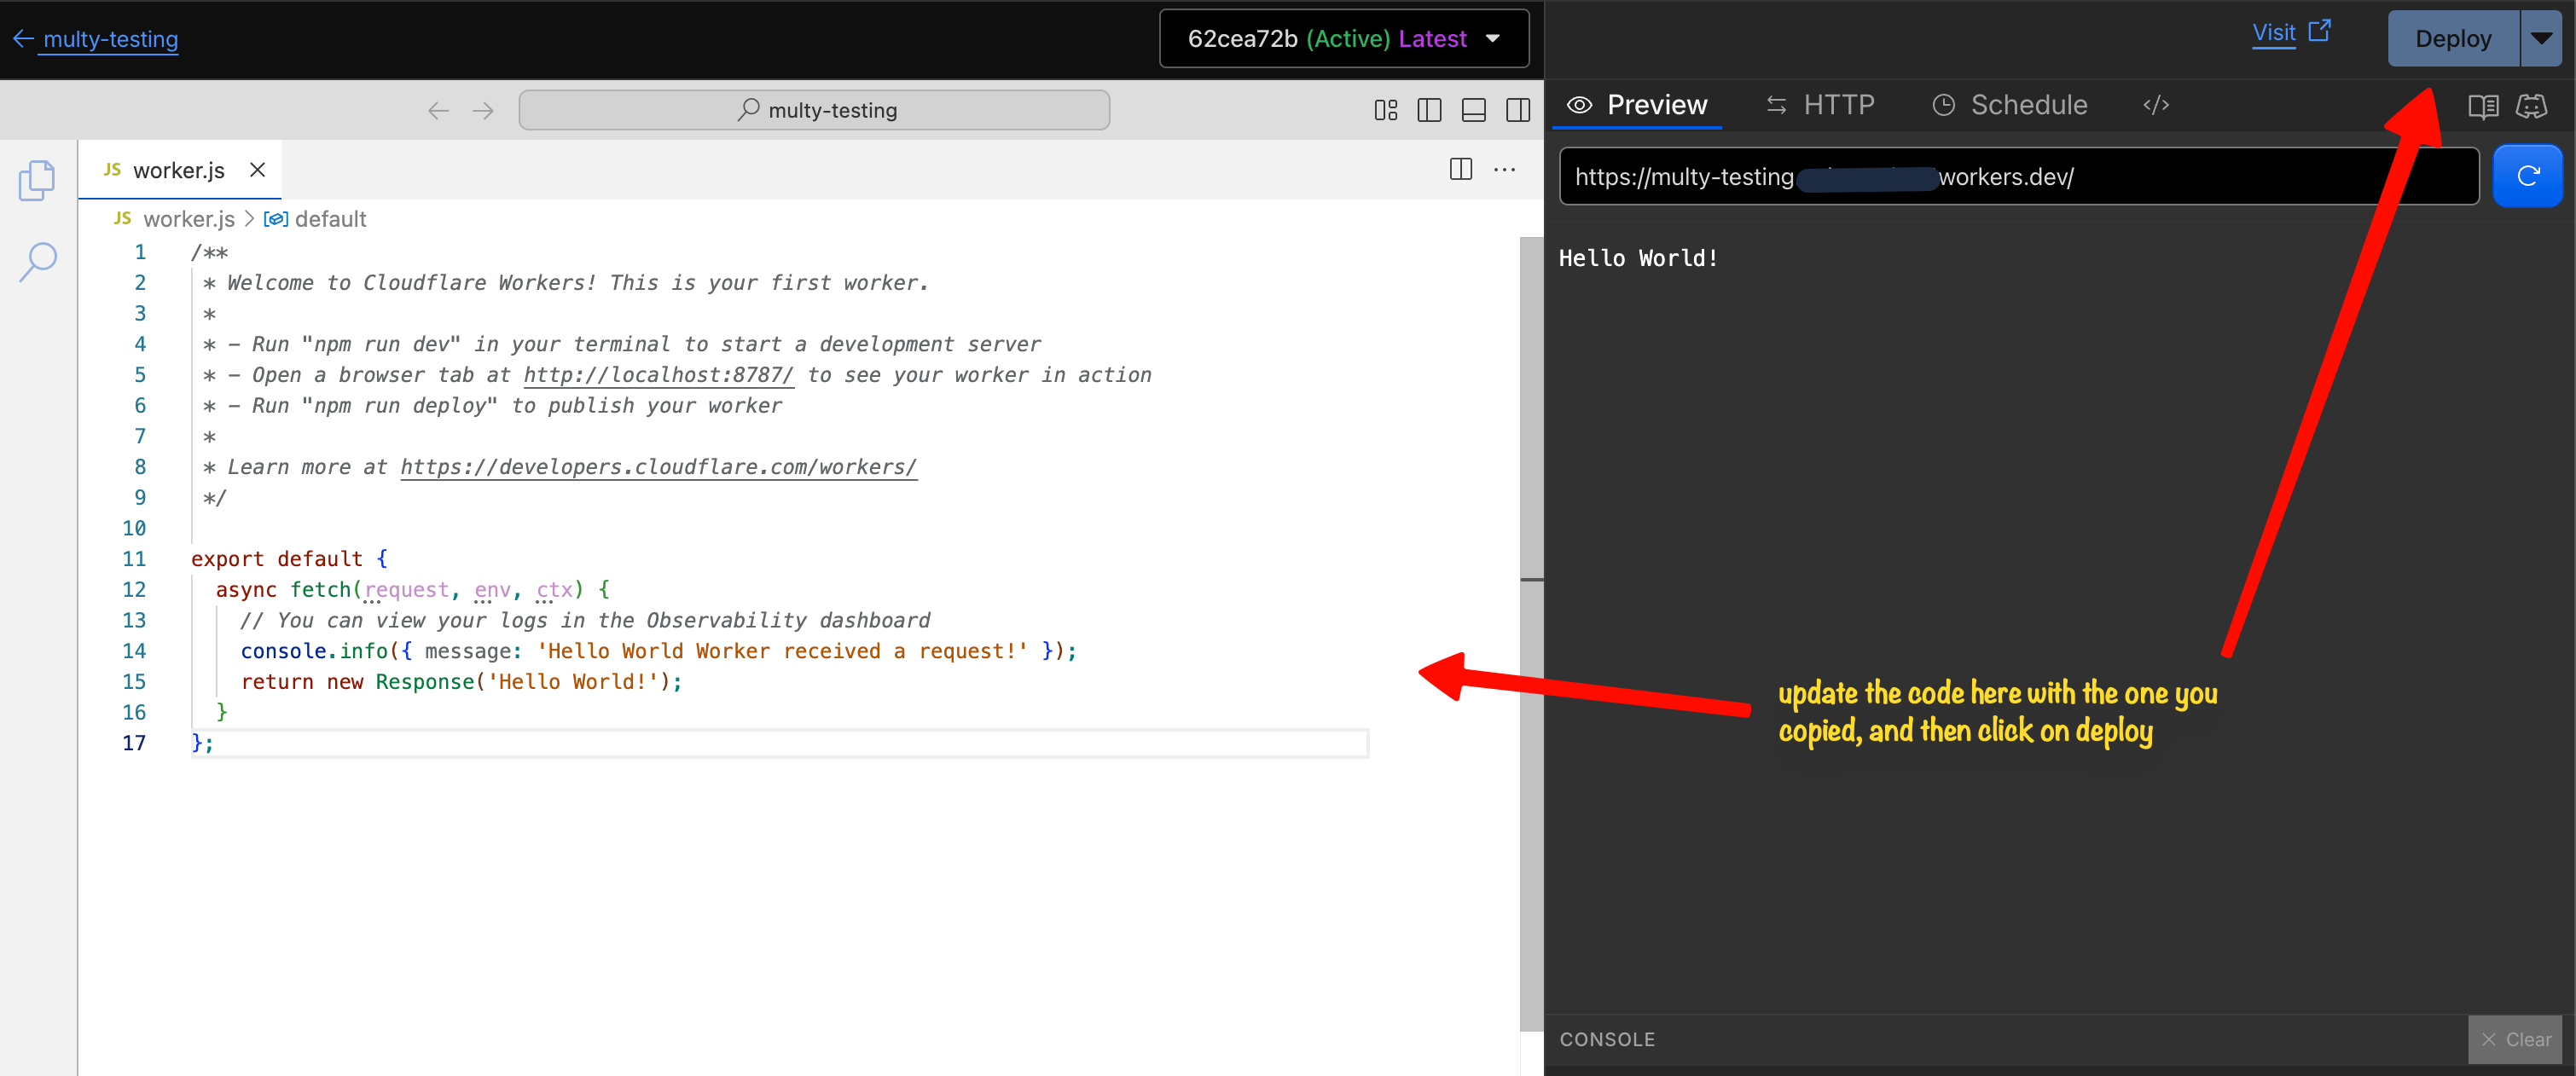
Replace the Hello World script with Multy's downloaded JS, then Deploy. After deploy, opening the Worker URL should show
Multy R2 endpoint worker(not Hello World). - 4
Add secrets (type must be Secret)
Leave the editor and open Settings → Variables and secrets → + Add. Create both:
AUTH_KEY_SECRET— API key Multy sends asx-api-keyPRIVATE_LINK_SECRET— used for signed private links
Use a strong, random value for each key. You can generate one with Avast's Password Generator (16+ characters recommended).
Save your API key
Copy and store theAUTH_KEY_SECRETvalue somewhere safe (e.g. a password manager or notepad) — you will need it later when connecting this UI to your Worker. Cloudflare will not let you view Secret values after saving.Use Secret, not Plaintext
For both keys, set the Cloudflare type to Secret (encrypted). Do not leave them as Plaintext — Plaintext values are visible in the dashboard and in config exports.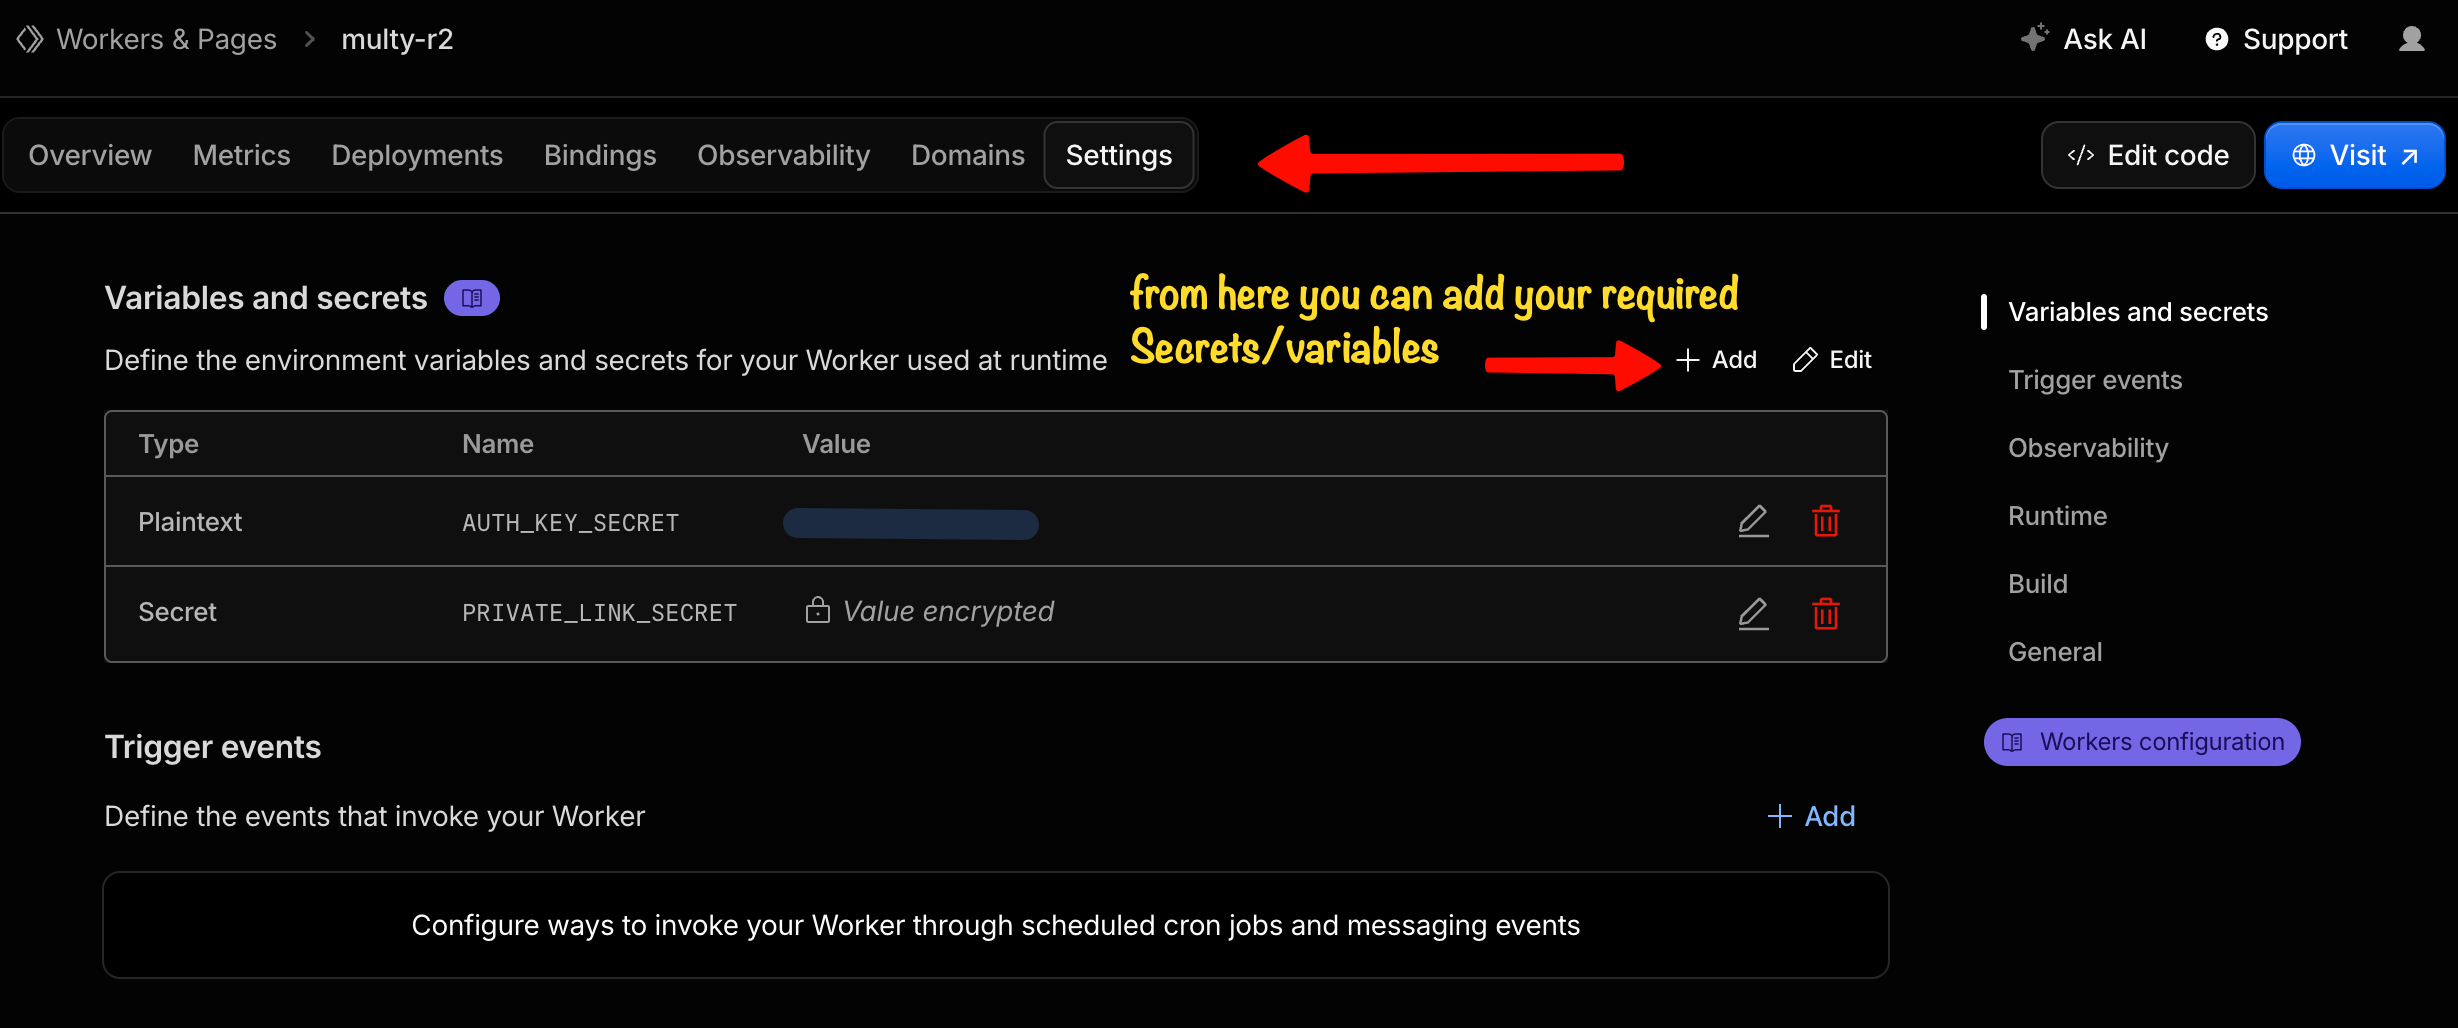
Settings → Variables and secrets → + Add. Both AUTH_KEY_SECRET and PRIVATE_LINK_SECRET must be type Secret. - 5
Attach R2 bindings (and D1 if needed)
Open Bindings (or Overview → Bindings → Add a binding) and connect each R2 bucket. For the default bucket path, use variable name
R2_BUCKETorBUCKET_A. Add more bindings with any valid name for multi-bucket mode in the UI. Attach D1 asDBif you use control-plane routes.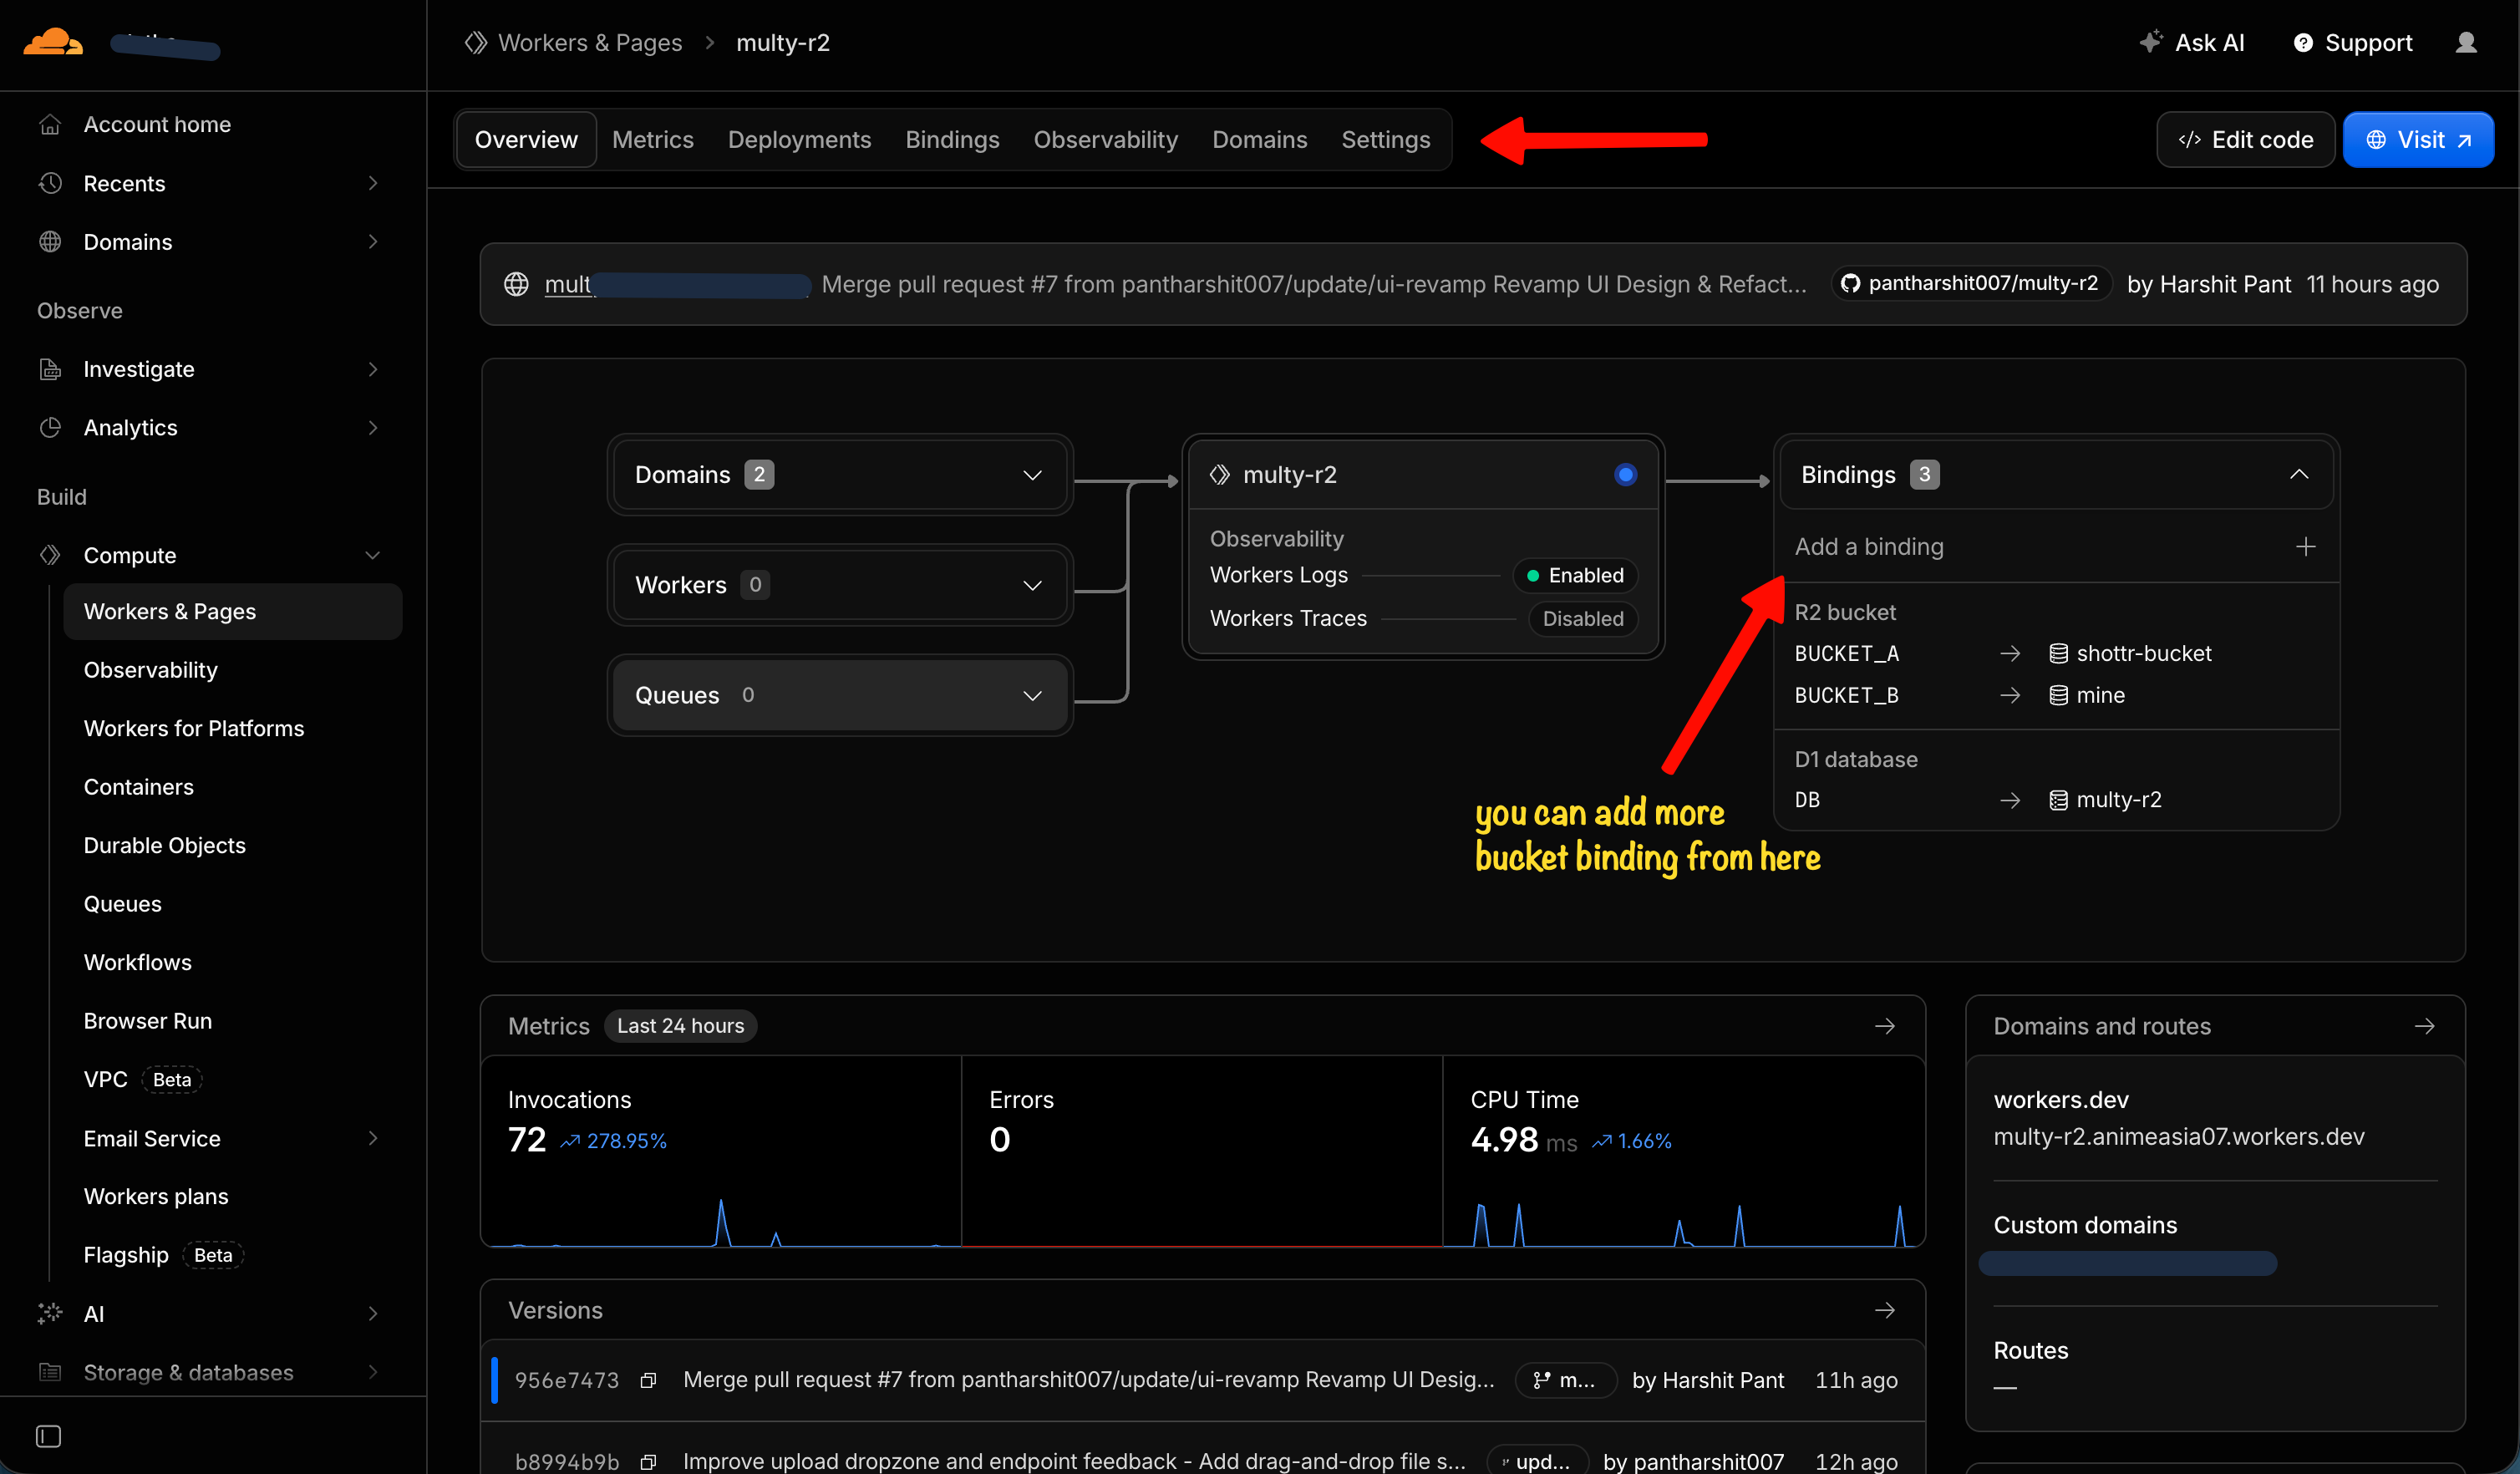
Overview Bindings panel — add R2 bucket bindings from here. Bindings tab: each R2 row is variable name → real bucket. Create buckets under Storage & databases first, then bind them here. - 6
Confirm the Worker is live
Open the Worker URL again — you should still see
Multy R2 endpoint worker. Save that URL;
you will paste it into Multy next.
3. Connect Multy R2
- 1
Open the endpoint form
On the home page, fill in the New Endpoint panel:
- Workers Endpoint — your Worker URL (no trailing path)
- API Key — same value as
AUTH_KEY_SECRET - Custom Domain — optional; the R2 custom domain (or subdomain) connected to that bucket for public CDN URLs
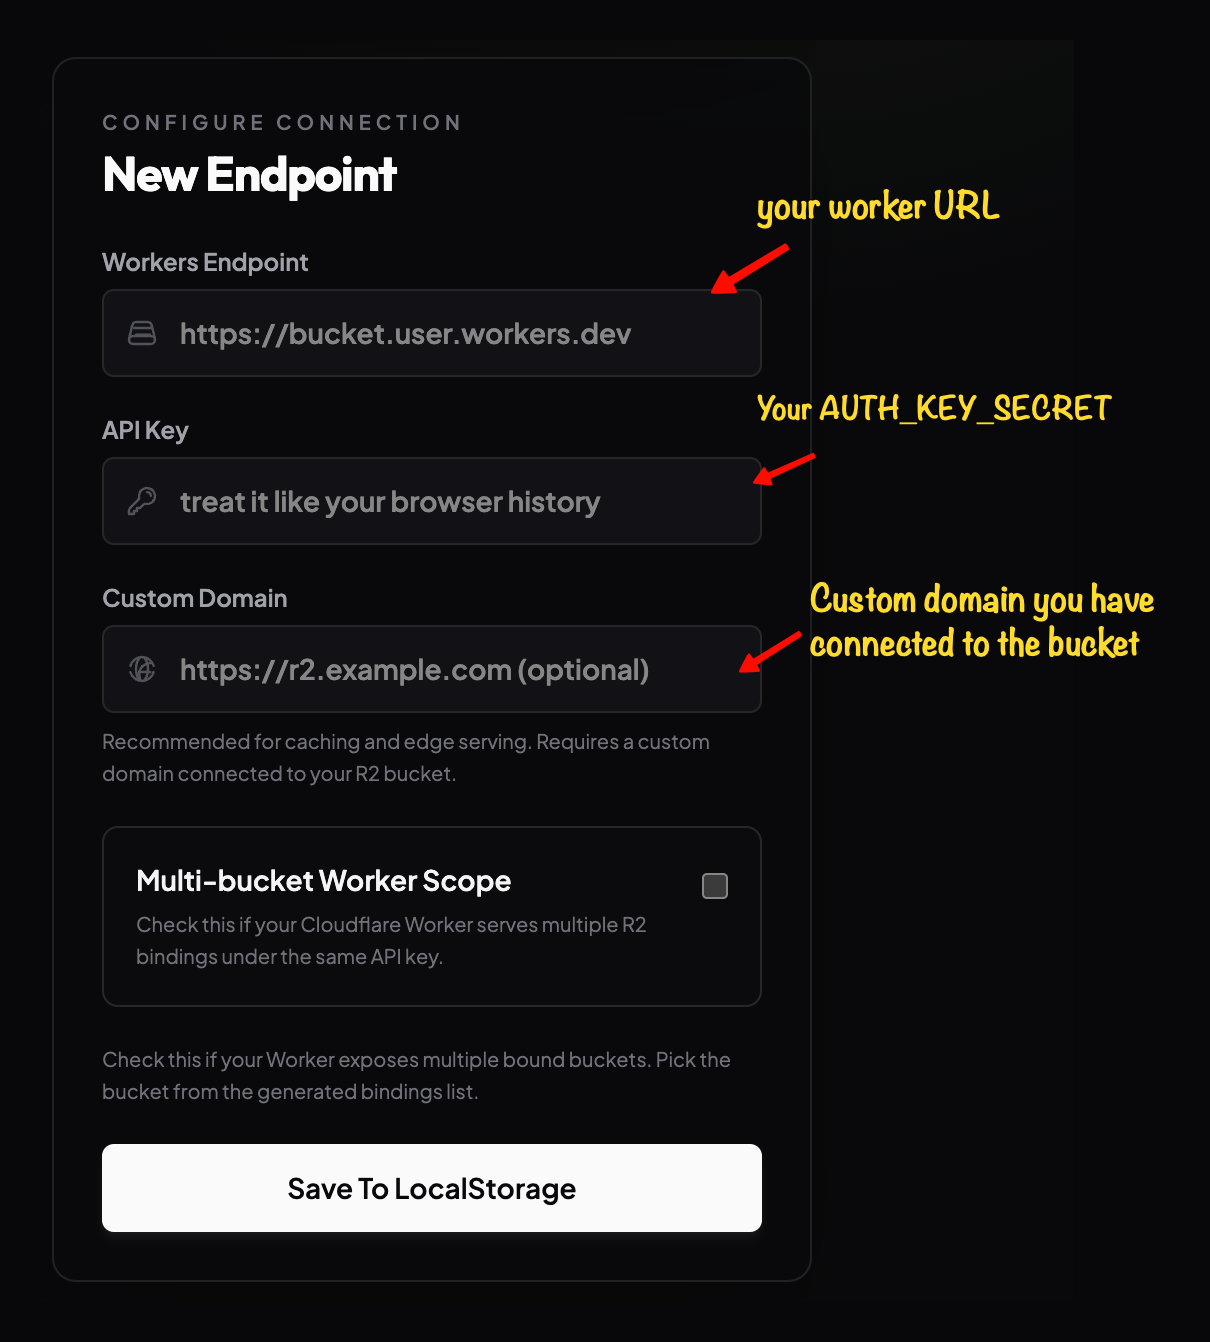
Endpoint = Worker URL. API Key = AUTH_KEY_SECRET. Custom Domain = the per-bucket R2 custom domain (optional). - 2
Optional multi-bucket mode
If the Worker exposes several R2 bindings, enable multi-bucket mode. The UI calls
GET /api/r2/bindingswith your API key and lets you pick a binding. Each binding can have its own R2 custom domain entered in Multy (one domain per bucket). - 3
Save and open
Save to localStorage, then open the endpoint card. Upload, list, delete, and copy public URLs all go through your Worker — credentials never leave the browser except as
x-api-keyto that host.
4. Custom domain (optional)
R2 custom domains are per bucket
cdn.example.com → bucket A, assets.example.com → bucket B. You cannot point one R2 custom domain at multiple buckets. In Multy, put each bucket's domain in that endpoint/binding's Custom Domain field so copy-links match the right CDN host.On the Worker
Workers → your worker → Domains & Routes → Custom Domain. Put that URL in the Multy Endpoint field. Simplest way to avoid workers.dev limits/blocks.
On the R2 bucket (CDN)
R2 → open that specific bucket → Settings → Custom Domains → + Add. Put that host in Multy Custom Domain (not Endpoint). Public copy-links then use the CDN host while API traffic still hits the Worker.
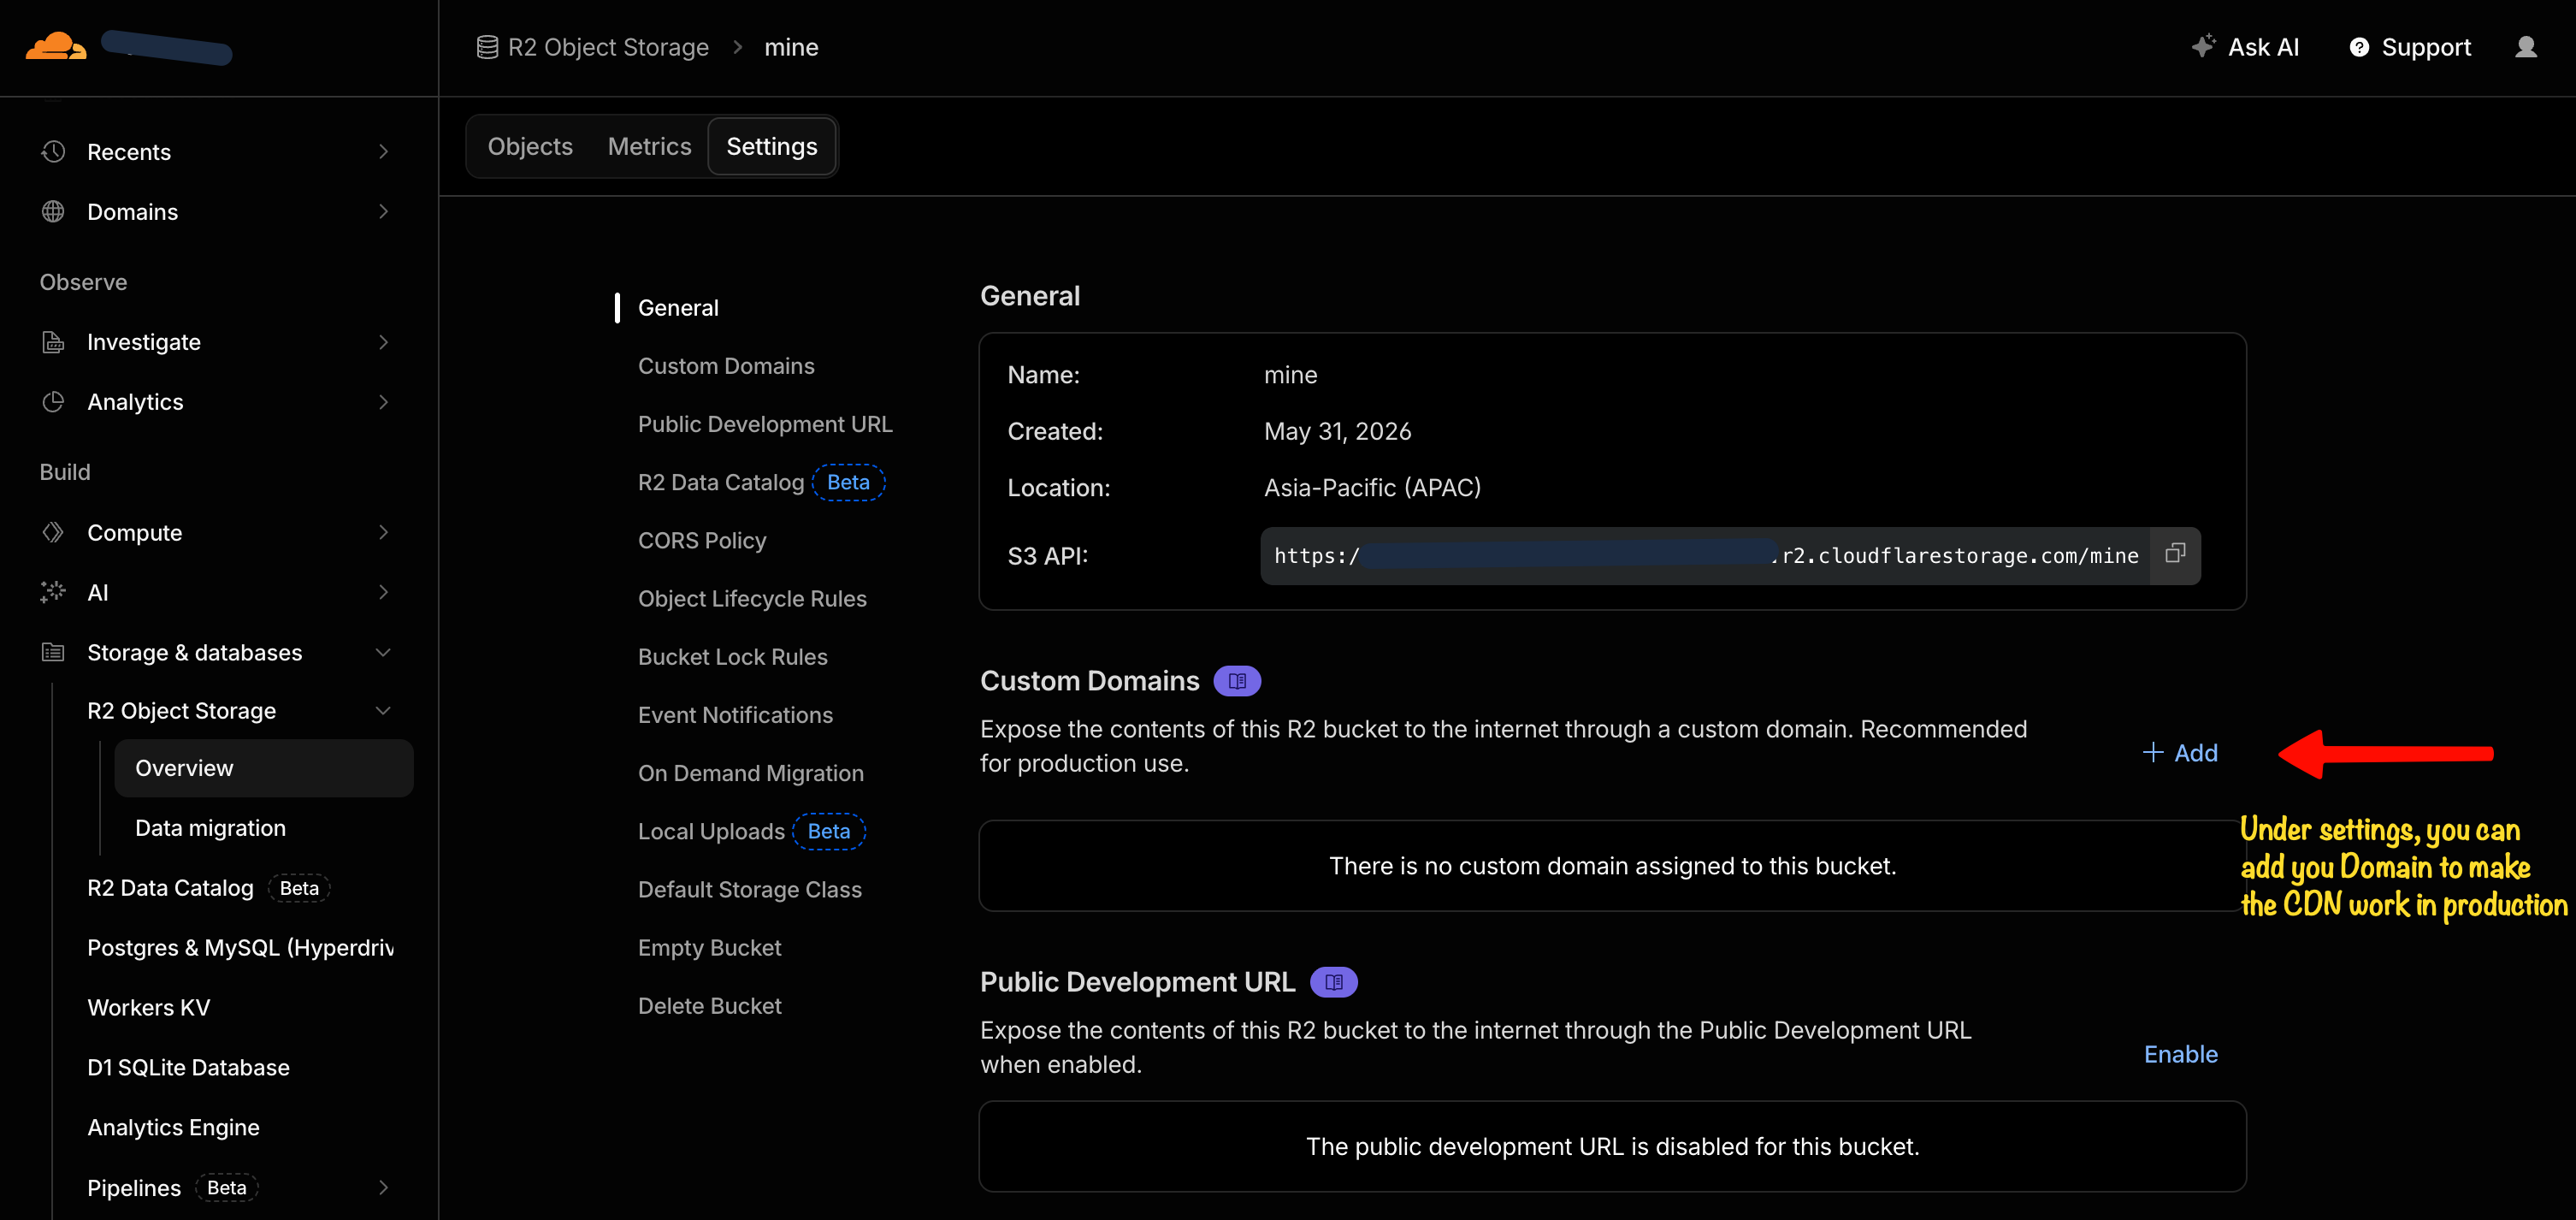
Public reads also work via the Worker at /cdn/<key> (default bucket) or /cdn/<binding>/<key> (multi-bucket). Writes stay on /api/r2.
How Multy ships the Worker JS bundle
Multy is TypeScript + Hono. There is no hand-written single file in the repo root — Wrangler produces the final multi-bucket bundle. That file is what end users paste.
GitHub Release (auto on main)
CI workflow release-worker-bundle.yml runs on each push to main, builds the multi-bucket Worker, and updates the rolling worker release asset worker.js. Users download and paste — no clone required.
Inline: https://raw.githubusercontent.com/pantharshit007/multy-r2/release-worker-js/worker.js
Download: https://github.com/pantharshit007/multy-r2/releases/download/worker/worker.js
pnpm build:worker-bundle
# → dist-worker/index.js
# CI renames to worker.js on the worker release
Heads-up for local builds: friendly multi-bucket labels come from src/server/generated/bucketNames.ts (generated from your wrangler.jsonc). Binding discovery at runtime is dynamic — wrong labels are cosmetic only.
2. CLI deploy for maintainers / power users
Clone/fork, edit bindings, set secrets, run pnpm deploy:worker. Same Worker code; better for config-as-code and upgrades via git pull.
3. Do not treat the Pages UI bundle as the Worker
The Vite dist/ output is the SPA only. It cannot bind R2. Users who want their own UI deploy Pages separately (pnpm deploy:pages) and still need a Worker for storage.
Stuck? Open an issue on GitHub. API reference lives in the repo at docs/api.md.